
How to Set up Conettix IP Reporting for Bosch Solution 2000 & 3000
Step-by-Step Guide to Conettix IP Setup for Bosch Solution 2000 & 3000"
The Bosch Solution 2000 and Bosch Solution 3000 support reporting in a number of ways and we have up to 4 report paths that can be programmed.
There are several steps to have Conettix IP Reporting via the B426-M module to a Base Station Receiver
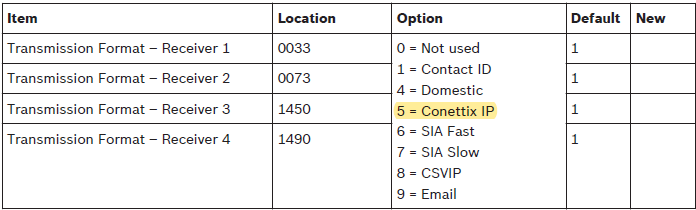
First, we must set the Transmission Format.
From Installation Manual:
Transmission Format For Receivers
Next, we must set the Subscriber ID
Subscriber ID Number for Receivers
| Item | Location | Option | Default | New |
| Subscriber ID Number - Receiver 1 | 0034 - 0039 | 0 | ||
| Subscriber ID Number - Receiver 2 | 0074 - 0079 | 0 | ||
| Subscriber ID Number - Receiver 3 | 1451 - 1456 | 0 | ||
| Subscriber ID Number - Receiver 4 | 1491 - 1496 | 0 |
The Subscriber ID Number is transmitted to identify the calling control panel. Enter the Subscriber ID Number in the six locations provided for each receiver
Next, there are a number of specific settings we must do to match the Base Station receiver settings
Note: we can only set up Conettix IP reporting using Receiver 1 or Receiver 2 report paths.
Conettix Items for Receivers
| Item | Location | Option | Default | New |
| Anti-Replay | 1400 |
1 = Anti-Replay for Receiver 1 Enable |
3 | |
| ACK Wait Time - Receiver 1 | 1401 - 1402 | 0 - 9 = 0 - 99 sec. | 5 | |
| Heart Beat Time - Receiver 1 | 1403 - 1404 | 1 - 9 = 1 - 99 min. | 1 | |
| ACK Wait Time - Receiver 2 | 1405 - 1406 | 0 - 9 = 0 - 99 sec | 5 |
| Item | Location | Option | Default | New |
| Heart Beat Time - Receiver 2 | 1407 - 1408 | 1 - 9 = 1 - 99 min. | 1 | |
| ACK Wait Time - Receiver 3 | 1409 - 1410 | 0 - 9 = 0 - 99 sec. | 5 | |
| Heart Beat Time - Receiver 3 | 1411 - 1412 | 1 - 9 = 1 - 99 min. | 1 | |
| ACK Wait Time - Receiver 4 | 1413 - 1414 | 0 - 9 = 0 - 99 sec. | 5 | |
| Heart Beat Time - Receiver 4 | 1415 - 1416 | 1 - 9 = 1 - 99 min. | 1 |
If we have completed the above programming correctly and we have installed and programmed the B426-M module correctly to the system we should now be able to receive reports from the panel.
External Network Modules
| Item | Location | Option | Default | New |
| External Network Module 1 | 0081 |
0 = Not used |
0 | |
| External Network Module 2 | 0082 | 0 |
Because the panel has the B426-M IP module on it and is configured to be operational an End User would also be able to have and use the RSC+ App on their phone and receive both notifications and also control the system
The RSC+ APP for both IOS and Android allows a User to:
( See Alarm Notifications / Arm /Disarm / operate programmed Outputs / view the History Log)
Network Module Cloud Connection
| Item | Location | Option | Default | New |
|
Module 1 Cloud Connection |
4456 |
0 = Disable
|
0 | |
| Module 2 Cloud Connection | 7456 | 0 |
if with text codepad, go to menu 721 Network Module to enable/disable the cloud module B4xx-M.
This guide is for Bosch Solution 2000 and Bosch Solution 3000

Rudy from Australia purchased
Bosch
1 hour ago
Completed by Alarm Expert